
TL;DR
Moving your rig into a closet and properly treating it with strategic placement and ventilation can drastically reduce noise and improve sound quality. Properly sealing gaps, addressing reflection points, and ensuring airflow are key to a successful setup.
Think a closet is just a tiny, echo-prone box? Think again. For many creators, it’s the perfect secret weapon—if you know how to treat it. The real game-changer isn’t just slapping foam on the walls; it’s about placing your sound treatment where it counts and keeping your rig cool while it roars. This guide reveals how to turn that tiny closet into a quiet, professional-sounding studio, focusing on placement, dampening, and clever ventilation.
Forget the myth that more foam equals better sound. Instead, you’ll learn how to strategically position absorption panels, seal leaks, and keep your hardware cool. Let’s cut through the noise—literally—and get your closet setup sounding crystal clear.
Acoustic dampening
& the rig in the closet.
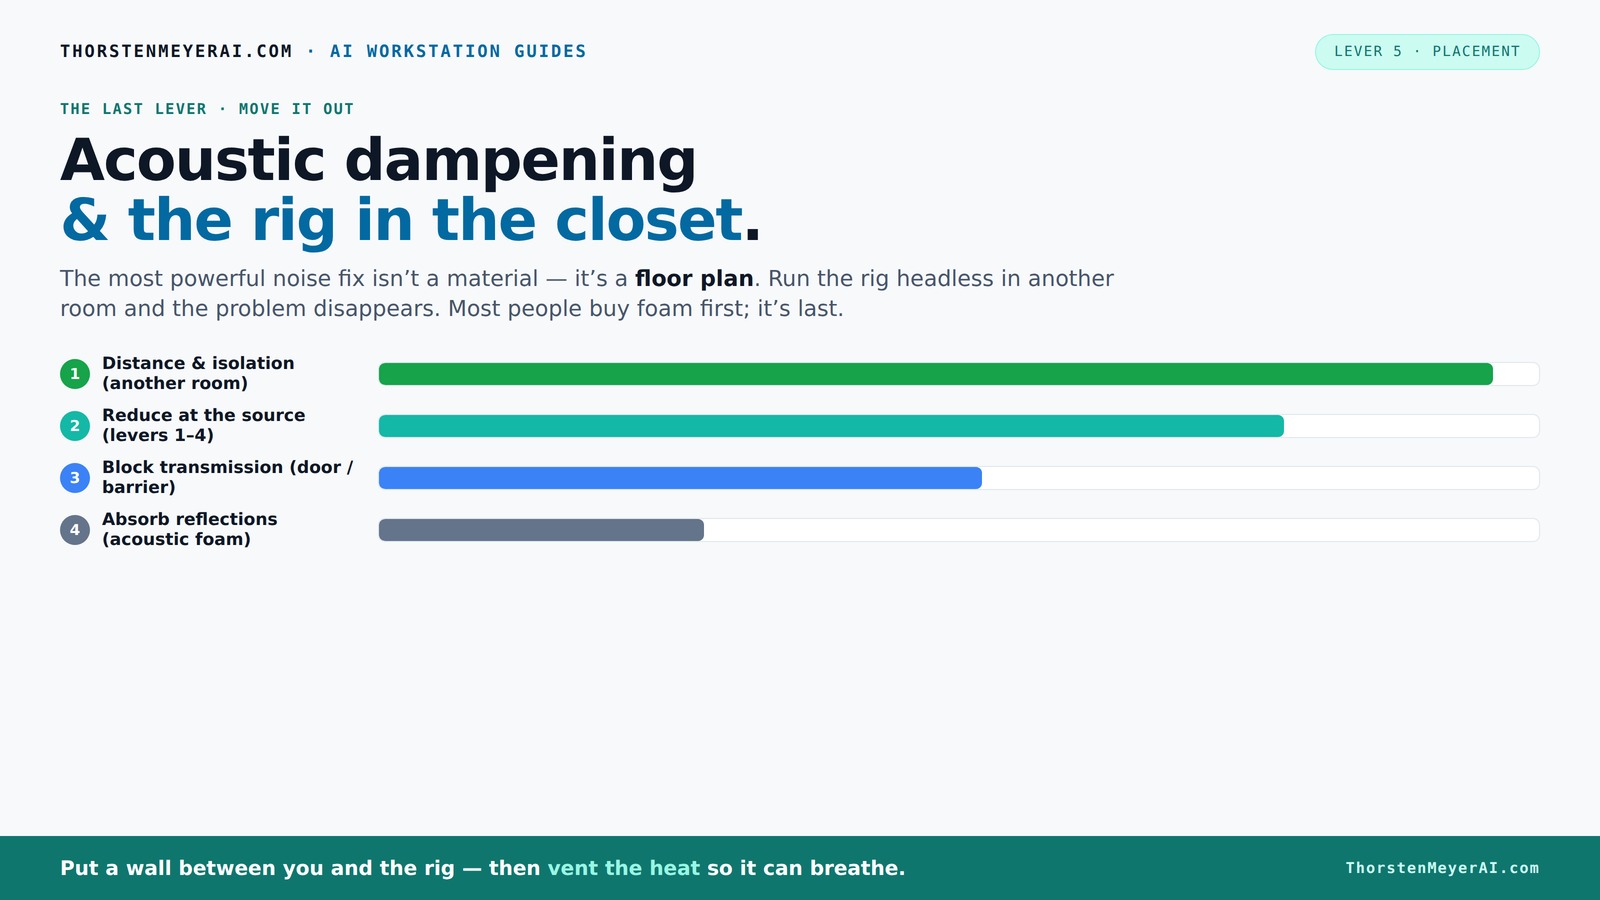
The most powerful noise fix isn’t a material — it’s a floor plan. A rig you can’t hear because it’s in another room beats any amount of foam. Tap the approaches in Part 1 to see what actually works.
(another room)
(levers 1–4)
(door / barrier)
(acoustic foam)
Contain the noise, not the heat
Key Takeaways
- Treat reflection points—behind the mic, side walls, and ceiling—to maximize clarity.
- Seal gaps around the door and other leaks to cut noise transmission dramatically.
- Use bass traps in corners only if you notice low-frequency buildup or boominess.
- Ensure proper airflow with quiet ventilation to keep hardware cool in a sealed closet.
- Prioritize placement and sealing over just adding foam for real, noticeable improvements.
acoustic treatment panels for closet studio
As an affiliate, we earn on qualifying purchases.
As an affiliate, we earn on qualifying purchases.
How to Make Your Closet Sound Better with Smart Placement
Starting with placement means understanding where sound bounces and where your mic captures the most reflections. The key is to treat the main reflection points—those spots where sound from your voice hits the wall behind the mic, the ceiling, and the side walls. You can learn more about this process in Acoustic Dampening, Placement, and the "Rig in the Closet" Setup. For example, if your mic faces a wall, put absorption panels directly behind it. This reduces flutter echo and makes vocals sound tighter.
In a real-world scenario, a creator noticed her voice improved dramatically when she added a foam panel right behind her mic, right where the sound first hits. Meanwhile, side walls at ear level help cut early reflections that cause muddiness. The goal? Keep your voice crisp and clear, with no harsh echoes bouncing back.
Understanding why this matters: reflection points are where sound waves bounce and create echoes or muddiness. By strategically placing treatment at these points, you’re effectively controlling the acoustics, which results in clearer recordings. The tradeoff is that over-treating can make the space sound unnaturally dead, so it's about finding the right balance to preserve natural tone while reducing problematic reflections.
soundproof door seal for recording room
As an affiliate, we earn on qualifying purchases.
As an affiliate, we earn on qualifying purchases.
Seal Gaps and Treat the Closet Door for True Silence
Gaps around the closet door are sneaky sound leaks that ruin your quiet. Sealing these cracks with weatherstripping or acoustic sealant is an easy, inexpensive fix. For more tips, see Acoustic Dampening, Placement, and the "Rig in the Closet" Setup. For example, a streamer sealed his closet door with foam strips, cutting sound leakage by over 40%. Overlap foam or blankets on the door frame to block sound from escaping.
Remember: sound travels through tiny cracks and leaks. Your door is the main weak spot—treat it like an opening in your fortress. Cover it with foam, use draft stoppers, or hang blankets to seal every gap. The importance of this step is often underestimated; small leaks can significantly compromise your soundproofing efforts, making your recordings bleed noise into the environment or pick up external sounds. The tradeoff here is the effort involved—sealing every gap takes time but yields a noticeable difference in noise isolation.
Effectively sealing gaps reduces external noise intrusion and prevents your sound from escaping, which is crucial if you’re recording in a noisy environment or want to keep your setup discreet. It’s a simple step with a high payoff, but it requires attention to detail to ensure all leaks are addressed.
ventilation fan for small studio closet
As an affiliate, we earn on qualifying purchases.
As an affiliate, we earn on qualifying purchases.
Handle Floors and Ceilings — Don’t Overlook These Key Spots
The floor and ceiling play a big role in a tiny space’s acoustics. Hard floors bounce sound back up, causing unwanted reflections. You might find helpful insights in biodivert.com about managing environmental factors for better sound environments. Putting a thick rug or carpet under your chair and mic area absorbs those bouncing sounds. One musician swore by a plush, shaggy rug that made her vocals sound warmer and less boxy.
Ceiling treatment, like hanging acoustic panels or foam, can dampen sound that travels upward and bounces down. In tight closets, ceiling absorption prevents quick sound reflections that muddy your recordings. It’s a small step that makes a big difference.
Implementing these treatments involves understanding that every surface contributes to the overall acoustic environment. Thick rugs or foam panels on the ceiling can prevent sound waves from bouncing around excessively, which can cause a hollow or echoey sound. The tradeoff is that adding too much can deaden the space too much, so aim for a balanced approach that maintains some natural room ambiance while controlling problematic reflections.
sound isolation foam panels
As an affiliate, we earn on qualifying purchases.
As an affiliate, we earn on qualifying purchases.
When and Why to Use Bass Traps in a Tiny Closet
Bass traps are specialized panels that soak up low frequencies, especially in corners. In a small closet, low-end buildup can make recordings boomy or muddy. Learn more about acoustic treatment options at astrophotographyhq.com. Installing bass traps in the corners where walls meet can tame these frequencies. For example, a hobbyist installed 4-inch thick traps in his closet corners and noticed a 30% reduction in low-end rumble.
If your recordings sound boomy or your voice has a hollow quality, bass traps are your best bet. They help balance the sound, making vocals or instruments clearer and more professional.
Understanding why bass traps matter: low frequencies tend to accumulate in corners because of how sound waves behave—this is called boundary reinforcement. By placing traps there, you’re effectively breaking the cycle of low-end buildup, which can otherwise cause a muddy or boomy sound. The tradeoff is that bass traps are often more expensive and take up space, but their impact on low-frequency clarity is well worth it in a small, reflective environment.
Ventilation Matters: Keep Your Rig Cool Without Noise
A sealed closet traps heat—hot, humid air that can cook your hardware. To prevent overheating, you need airflow. For more on maintaining optimal conditions, visit curiousminds.info. A simple passive vent or a quiet exhaust fan can do the trick. For example, a streamer used a small, quiet duct fan to exhaust hot air, keeping the closet cool while maintaining silence.
Active ventilation ensures your rig stays cool, preventing throttling or damage. Look into purpose-built soundproof cabinets or ducted airflow systems if you need serious silence and cooling in one package. Proper ventilation is the secret to a long-lasting, quiet rig.
Understanding why ventilation is critical goes beyond comfort: heat can cause your equipment to throttle performance or even fail prematurely. The challenge is balancing airflow with noise control. Quiet fans or venting systems are designed to minimize sound while providing effective cooling. The tradeoff involves potential added complexity and cost, but neglecting proper ventilation can lead to hardware issues that compromise your entire setup.
Putting It All Together: Your Step-by-Step Closet Soundproofing Plan
- Start with sealing gaps around the door and any cracks.
- Position absorption panels at reflection points—behind the mic and on side walls.
- Add bass traps in corners if needed.
- Place a thick rug under the mic area to reduce floor bounce.
- Ensure proper ventilation—install a quiet exhaust if necessary.
- Test your setup with recordings, adjusting panels and sealants as needed.
This straightforward plan maximizes your effort for the biggest gains, turning your closet into a controlled, quiet zone.
Frequently Asked Questions
Is acoustic dampening the same as soundproofing?
Not quite. Acoustic dampening reduces echoes and reflections inside a space, making recordings clearer. Soundproofing blocks noise from leaking out or coming in, which often requires heavier construction like extra drywall and sealing gaps.Where should I place foam or panels in a closet booth?
Place panels at reflection points—behind the mic, on side walls at ear level, and on the ceiling. Use bass traps in corners if you notice low-end issues. Sealing gaps around the door is also essential for noise control.Do I need bass traps in a small closet?
Only if your recordings sound boomy or muffled in the low end. In small, reflective spaces, bass traps tame low-frequency buildup, resulting in clearer vocals or instrument recordings.How thick should acoustic panels be?
In a closet, 2-inch panels are usually enough for mid and high frequencies. For better low-frequency absorption, 4-inch panels are recommended, especially if you notice a hollow or muddy sound.What about the closet door and airflow?
Seal gaps around the door using weatherstripping or foam. For airflow, install a quiet exhaust fan or vent, ensuring your rig stays cool without noise leaks.Conclusion
Turning a closet into a quiet, effective studio isn’t about covering every surface in foam. It’s about smart placement—treating reflection points, sealing gaps, and managing heat. A well-ventilated, thoughtfully treated closet can rival much bigger, more expensive setups.
Remember, the biggest noise reduction often comes from moving your rig away and sealing leaks. The closet isn’t just a storage space anymore—it’s your secret weapon for clean, professional sound. Ready to quiet that roar and focus on what matters?