
Use this guide to select a science experiment kit for a child, prepare a safe workspace, and carry out an activity with a clear learning result. It is for caregivers, teachers, and other adults helping children explore science, including first-time kit users. Choosing a kit may take 10-20 minutes; a typical experiment takes 20-60 minutes, depending on its instructions and drying or waiting time.

Prime made for students and young adults
- Fast, free delivery for dorm and study essentials
- Prime Video and Amazon Music included
- Member-only deals
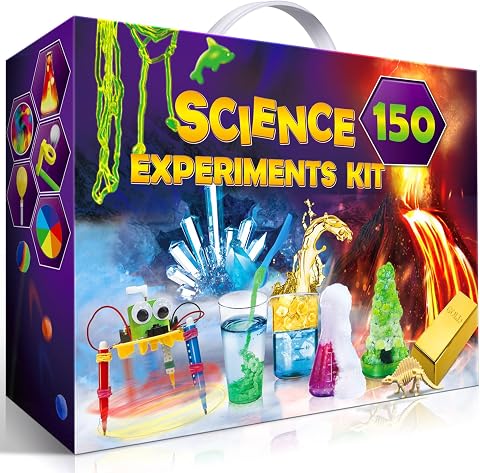
UNGLINGA 150 Experiments Science Kit for Kids – Chemistry Lab STEM Toys
- ✔ Brand: UNGLINGA
- ✔ Experiments: 150
- ✔ Recommended age: 8 years and up
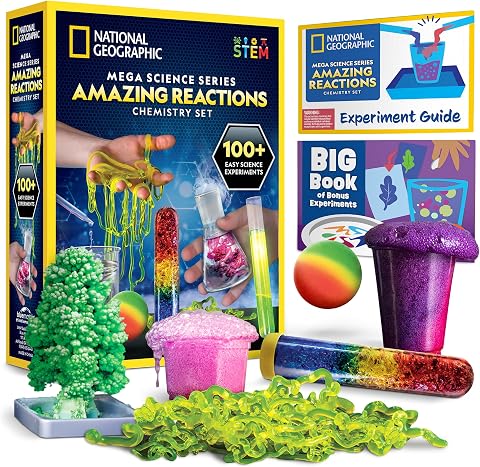
National Geographic Amazing Chemistry Set – 100+ Science Experiments for Kids Ages 8-12
- ✔ Brand: Blue Marble, National Geographic sub-brand
- ✔ Experiments: 100+ total: 15 core and 85 bonus
- ✔ Recommended age: 8 years and up

National Geographic Science Magic Kit with 100+ Experiments for Kids
- ✔ Brand: Blue Marble, National Geographic
- ✔ Experiments: 20 included-material magic experiments plus 85+ bonus ideas
- ✔ Recommended age: 8 years and up
Difficulty: Beginner | Time: 30-90 minutes, including kit selection and one experiment
What You’ll Need
Tools & Materials:
- The science kit and its complete instruction sheet
- A clear, stable work surface
- The household items listed in the kit instructions, such as water or a spoon
- Protective items specified by the manufacturer, such as safety glasses or gloves
- Paper towels, a rubbish bag, and a sink nearby
- A notebook or paper and pencil for recording observations
Knowledge:
- Read the kit label and instructions before handing materials to a child
- Match the activity to the child’s age, abilities, and level of adult supervision
- Follow the manufacturer’s safety, disposal, and first-aid directions
Check the box for age guidance, included and required materials, experiment count, and any warnings. Age guidance is a starting point, not a substitute for reading the directions: an activity may require adult help even when the child meets the stated age. Do not use a kit with missing labels or unclear safety instructions. Keep food and drinks away from the work area.
UNGLINGA 150 Experiments Science Kit for Kids – Chemistry Lab STEM Toys
The UNGLINGA kit earns our top spot because it reaches beyond chemistry. Its 150 experiments cover chemistry, physics, earth science, and surface tension, making it a stronger match for a child who wants to explore different kinds of questions rather than stay at one lab bench. The illustrated, step-by-step manual also gives families a useful starting point: clear instructions can help a child work through an activity with less guesswork, although the age recommendation and experiment type still make adult oversight sensible.Compared with National Geographic Amazing Chemistry, UNGLINGA offers a wider subject mix, while the National Geographic set is more specifically organized around chemistry tools and activities. It also differs from Science Magic, which leans on performance and surprise rather than broad topic coverage. UNGLINGA’s large activity count is appealing, but it should not be read as a guarantee that every project is fully supplied; some activities may call for household items. We would choose it for variety and skip it if a child mainly wants a focused chemistry set with a defined collection of lab vessels or a magic-show format.
Pros:
- 150 listed experiments span several science areas.
- Illustrated, step-by-step manual supports independent reading and setup.
- Includes kid-friendly lab tools, materials, and goggles.
- Offers broader subject coverage than either National Geographic kit.
Cons:
- Some experiments may require additional household items.
- Younger children may need adult supervision, especially when following multi-step activities.
Best for: Families seeking one kit that introduces several science topics to a child aged eight or older.
Not ideal for: Children who want only chemistry experiments, or families expecting every activity to use included materials without household additions.
Bottom line: For the broadest mix of science topics in this lineup, UNGLINGA is our most versatile choice, provided families are prepared to supply occasional household items.
“For the broadest mix of science topics in this lineup, UNGLINGA is our most versatile choice, provided families are prepared to supply occasional household items.”
National Geographic Amazing Chemistry Set – 100+ Science Experiments for Kids Ages 8-12
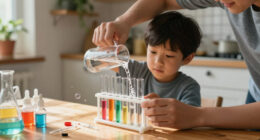
For a child drawn specifically to chemistry, the National Geographic Amazing Chemistry Set gives the activities a more recognizable lab feel. The 15 core experiments use tools such as test tubes, beakers, and pipettes, which help distinguish it from UNGLINGA’s wider-ranging, multi-subject approach. Projects include a crystal tree, color-changing solutions, glowing test tubes, and a bouncy ball, so the set connects chemistry demonstrations with visible results that can hold a young experimenter’s attention.The advertised total includes more than 100 activities, but the split matters: there are 15 core experiments and 85 bonus ideas that use common household items. Compared with UNGLINGA’s 150 activities, this kit is less expansive across science disciplines; compared with Science Magic, it is more directly about chemistry rather than tricks. Its supplied lab tools are a practical advantage, but families should not assume the bonus activities are fully kitted. This is our chemistry-focused pick, not the best choice for a child who wants physics and earth science in the same set or a kit where every project is ready without sourcing anything else.
Pros:
- Includes test tubes, beakers, and pipettes for a more lab-like setup.
- Core activities include visible chemistry demonstrations such as color changes and crystal growth.
- Bonus booklet adds activities using common household items.
- Clearer chemistry focus than the broader UNGLINGA kit or performance-led Science Magic kit.
Cons:
- Many of the 85 bonus experiments require additional household materials.
- The 15 core experiments are a smaller ready-made set than the headline activity total may suggest.
- Adult supervision is likely helpful for younger children.
Best for: Children aged eight to twelve who want chemistry demonstrations and the feel of working with basic lab equipment.
Not ideal for: Families looking for a broad mix of science subjects or a large collection of experiments with all materials included.
Bottom line: Choose Amazing Chemistry when lab-style chemistry matters more than broad subject coverage, while planning ahead for household supplies for many bonus activities.
“Choose Amazing Chemistry when lab-style chemistry matters more than broad subject coverage, while planning ahead for household supplies for many bonus activities.”
National Geographic Science Magic Kit with 100+ Experiments for Kids
The National Geographic Science Magic Kit is the most specialized pick here: it makes the experiment itself part of a trick. Its 20 magic-themed activities include materials, and a bonus booklet adds more than 85 experiments. That presentation can be a smart way to engage a child who enjoys surprising family members or explaining how an effect works. Compared with Amazing Chemistry, it puts less emphasis on a conventional collection of lab tools and more on the reveal; compared with UNGLINGA, it trades broad science coverage for a more playful, performance-oriented identity.The key tradeoff is the difference between the supplied core activities and the bonus booklet. Materials are included for the first 20 experiments, while the additional activities require separately sourced items. That makes it less straightforward as an all-in-one kit for repeated projects than the headline count might imply. We would choose it for a child who likes magic, demonstrations, and sharing results, rather than one who wants the widest range of science topics or a focused introduction to chemistry equipment. As with the other kits, younger children may need an adult to help with directions and safe handling.
Pros:
- Materials are included for the first 20 magic experiments.
- Bonus booklet offers more than 85 additional experiment ideas.
- Performance-style activities give children a reason to demonstrate and discuss results.
- A more distinctive presentation than the chemistry-centered National Geographic set.
Cons:
- Bonus experiments require separately sourced materials.
- Its magic theme is less suitable for children who want conventional lab activities or broad science coverage.
- Some activities may need adult supervision for younger users.
Best for: Children aged eight and up who enjoy magic tricks, demonstrations, and explaining surprising effects.
Not ideal for: Kids seeking a broad science survey or a traditional chemistry kit with lab tools as its main draw.
Bottom line: Science Magic is the engaging choice for a child who loves tricks and demonstrations, but its core set is more self-contained than its bonus experiments.
“Science Magic is the engaging choice for a child who loves tricks and demonstrations, but its core set is more self-contained than its bonus experiments.”
As an Amazon Associate we earn from qualifying purchases.
Before You Start
Choose one experiment to complete rather than opening or mixing materials from several activities. Read all steps and warnings first, including instructions about ventilation, heat, sharp tools, small parts, and disposal. An adult must handle any activity the label reserves for adults. Do not substitute ingredients or combine kit chemicals unless the instructions specifically direct you to do so. If a child may have a relevant allergy or sensitivity, check the ingredient and material information before starting.
Step-by-Step Instructions
Step 1: Choose a kit that fits the child
Compare the kit’s age guidance with the child’s reading, fine-motor, and attention skills. Select a topic the child is curious about, such as plants, rocks, magnets, or simple circuits. Check how many experiments are included, how long each takes, whether adult supervision is required, and which extra household supplies are needed. Choose a kit with complete directions and safety information.
Tip: For a first activity, choose one with few steps and materials you can easily identify. Avoid buying a kit based only on its box image or advertised experiment count.
Check: You can name the experiment you plan to do, identify its required materials, and explain what adult help it needs.
Step 2: Check the contents and directions
Open the kit on a clear surface and compare its contents with the inventory, if provided. Read the full instructions for your chosen experiment before removing seals or pouring anything. Check that containers, labels, tools, and safety equipment are present and undamaged. Set aside only the materials needed for this activity; leave other kit components closed and stored as directed.
Tip: Do not proceed if a chemical container leaks, a label is missing, or a required component is absent. Contact the manufacturer or retailer for guidance instead of guessing what a substance is.
Check: Every item needed for the selected experiment is present, identifiable, and in usable condition.
Step 3: Set up a safe work area
Choose a level, well-lit surface that is easy to clean and away from food preparation. Move drinks, snacks, pets, and unrelated items out of reach. Put paper towels nearby, and place a rubbish bag or disposal container where the directions permit. Set out the protective equipment and household supplies the instructions name. Wash hands before beginning.
Tip: Protect the surface with a washable tray or covering if the directions allow one. Do not work near an open flame or use a stove, microwave, or other heat source unless the kit explicitly instructs an adult to do so.
Check: The work area is clear, the required supplies are within reach, and the child can work without leaning over other materials.
Step 4: Explain the experiment and safety rules
Tell the child what the activity will test or show, using a simple question such as, “Will this object float?” Point out the steps the child can do and any tasks reserved for an adult. Show how to handle the tools and materials as directed. Set clear rules: do not taste, sniff closely, touch, or mix materials outside the instructions; keep hands away from the face; and tell an adult about spills or discomfort immediately.
Tip: Invite the child to predict the result before starting. A prediction is a guess to test, not a promise that the experiment must prove correct.
Check: The child can repeat the main safety rule and describe what the experiment is testing.
Step 5: Follow the instructions in order
Work through one printed direction at a time. Have the child measure, pour, assemble, or observe only when that action is within their ability and the instructions permit it. Let an adult handle steps marked for adult use. Use the stated quantities and equipment; do not rush waiting periods or skip rinsing, drying, or setup steps. Pause if the next direction is unclear and reread it before continuing.
Tip: Keep lids and original labels with their containers. Never put unused materials back into an unmarked container or leave an active experiment unattended when the directions require supervision.
Check: The materials are used in the specified order and amounts, and each completed action matches a direction in the kit.
Step 6: Observe and record what happens
Ask the child to look closely at the result and describe what changed: for example, a color, texture, temperature, movement, or shape. Write down observations in the child’s own words, or draw what the setup looked like before and after. Compare the result with the original prediction without labeling an unexpected result as a failure. Follow any timing or repeat-trial directions in the booklet.
Tip: Describe what you can see rather than supplying an explanation too early. Ask, “What is different?” or “What stayed the same?” to help the child notice evidence.
Check: You have a clear observation or drawing that records the result and can be compared with the starting prediction.
Step 7: Clean up and store the kit
Follow the instructions for disposing of liquids, powders, batteries, or other materials; do not pour substances down a drain unless the directions say to. Wipe the work surface, clean reusable tools as directed, and wash hands. Return unused components to their labeled packaging and store the kit where children cannot access it without supervision. Record any missing or used-up items before closing the box.
Tip: If cleanup directions are missing or unclear, keep the material contained and contact the manufacturer or a suitable local waste service for advice rather than guessing.
Check: The experiment is stopped safely, the materials are disposed of or stored as directed, and the work surface and hands are clean.
Step 8: Review the result with the child
Ask the child what they predicted, what they observed, and whether the result matched the prediction. Help them connect the observation to the explanation in the kit booklet, while separating the observed evidence from the explanation. If the result differed from the booklet, check whether an instruction, quantity, timing, or environmental condition might account for the difference before trying again.
Tip: A child does not need to memorize technical terms for the activity to be worthwhile. Aim for a simple explanation tied to something they actually observed.
Check: The child can describe at least one observation and give a basic explanation or question about it.
Common Mistakes to Avoid
- Choosing a kit based on age alone. — Read the specific experiment directions and consider the child’s reading, coordination, attention, and supervision needs as well as the age guidance.
- Starting before checking the full instructions and supplies. — Read the activity from beginning to end and gather every listed item before opening or mixing materials.
- Changing measurements or substituting household materials. — Use only the amounts and materials named in the directions; an unapproved change can affect the result or create a safety risk.
- Treating an unexpected result as proof the activity failed. — Record what happened, then review the steps, measurements, and timing. Unexpected observations can still be discussed as evidence.
Troubleshooting
Problem: A required item is missing or a container is damaged.
Solution: Do not start that experiment or use an unidentified material. Keep damaged contents away from children, follow the package’s spill guidance, and contact the manufacturer or retailer for replacement or instructions.
Problem: The result does not match the booklet.
Solution: Check measurements, order of steps, waiting time, and any specified water or room conditions. Compare the actual setup with the diagram. Repeat only if the directions permit it and the materials remain safe to use.
Problem: The child spills a material or gets it on their skin or in their eyes.
Solution: Stop the activity and follow the kit’s first-aid and spill directions. Keep the child away from the spill, do not improvise cleanup for an unknown substance, and contact local poison control or emergency services when the label or exposure calls for it.
Problem: The child loses interest or finds the steps difficult.
Solution: Pause at a safe stopping point. Read one direction at a time, demonstrate a permitted action, or let the child observe while an adult completes the harder step. Do not skip safety directions to finish faster.
What Success Looks Like
The kit and activity matched the child’s abilities, all safety directions were followed, and the experiment was completed using the stated materials and sequence. The child can report at least one observation and connect it to the experiment’s question. Cleanup and storage follow the kit instructions. The result does not have to match a predicted or pictured outcome for the activity to count as successful.
Next Steps
Store the instruction booklet with the kit and note which materials were used or need replacement. If the child wants to continue, choose another activity from the same kit only after checking its directions and supplies. Extend the learning with a drawing, a written question, or a comparison that the kit instructions allow. Get manufacturer or qualified safety guidance before reusing damaged, unlabeled, or expired materials.
Frequently Asked Questions
How do I choose a science kit for a young child?
Start with the age guidance, then read the experiment directions for small parts, reading demands, and adult-only steps. Pick an activity the child can participate in safely, with an adult ready to supervise as the label directs.
Do I need to buy extra supplies?
Check the box and the chosen experiment’s materials list before opening the kit. Some activities need common items such as water, a spoon, or paper towels, but do not assume an unlisted substitute is suitable.
What should I do if the experiment does not work as shown?
Record the result instead of repeating the activity immediately. Review the quantities, order, timing, and conditions in the directions. Repeat only if the instructions allow it and there is no safety concern.
Can I leave a child to do the experiment alone?
Follow the kit’s stated supervision level and the child’s abilities. If the label requires adult supervision or reserves a step for an adult, stay present and handle that step yourself.
How should I dispose of leftover experiment materials?
Use the disposal directions supplied with the kit. Do not pour leftovers into a sink, place them in household rubbish, or mix them with other substances unless the instructions say that method is safe.
Fall Picks
fall essentials
As an affiliate, we earn on qualifying purchases.