
If your shipment is damaged in transit, start by examining the packaging for tears or crushed areas, and check inside for broken or missing items. Take clear photos of the entire package from multiple angles, showing labels, barcodes, and damage details. Capture close-ups of dents, tears, or crushed spots, and document the condition of contents. Good lighting and focused shots help your claim. Keep everything organized—if you keep going, you’ll learn how to make your evidence even stronger.
Key Takeaways
- Take clear, well-lit photos of the entire package from multiple angles before opening.
- Capture close-up images of visible damage, dents, tears, or crushed areas on packaging.
- Photograph all shipping labels, barcodes, and tracking information for verification.
- Document the internal condition of contents, noting any breakage, deformation, or missing items.
- Keep organized records and photos to support your damage claim with detailed evidence.
damage claim photo documentation kit
As an affiliate, we earn on qualifying purchases.
As an affiliate, we earn on qualifying purchases.
Assess the Damage and Gather Your Supplies
When you notice damage to your shipment, it is vital to assess the situation carefully before proceeding. Start by examining the packaging materials; look for tears, holes, or crushed areas that might reveal how the damage occurred. Check the contents to see if they are broken, missing, or deformed. Gather your supplies, including a camera or smartphone, to document the damage thoroughly. If you have shipping insurance, keep the policy details handy, as they will be necessary for your claim. Take note of any visible issues with the packaging materials and the condition of the items. Being methodical at this stage guarantees you gather the essential evidence needed to support your claim later. Proper documentation is a critical component of damage assessment and ensures a smoother claims process. Carefully inspecting projector packaging can help identify potential vulnerabilities that led to the damage. This initial assessment sets the foundation for a successful resolution. Additionally, paying attention to the air purifier maintenance can prevent issues that might cause damage during transit, such as loose components or fragile filters. Proper support for breakfast knowledge can also help you understand how to handle and package fragile items to prevent damage during shipping. Understanding precious metal storage requirements can also help ensure your valuable investments remain secure and undamaged during shipping.

𝟐𝟎𝟐𝟔 𝐧𝐞𝐰 HD1080P Sewer Camera with DVR 32GB, 4.3" Drain Camera (Easy to Use), Pipe Inspection Camera, 5000mAh, USB-C, Endoscope Camera with 4-Level LED Lights, Cable Marking, 100ft/30M
【Faster Identify Issues – HD 1080P Camera with 4.3" IPS Screen】:This sewer camera features a true HD 1080P…
As an affiliate, we earn on qualifying purchases.
As an affiliate, we earn on qualifying purchases.
Take Clear and Detailed Overall Photos of the Package
When taking photos of your package, make certain to capture the entire item from different angles. Focus on clearly showing any damage areas with close-up shots. Use good lighting to ensure every detail is visible and easy to assess. Additionally, document the packaging materials to provide context for the condition upon arrival.
Capture Entire Package
To guarantee your claim is properly supported, you should take clear and detailed overall photos of the entire package before opening it. Assure your pictures capture all sides, including the top, bottom, and any labels or markings. This helps document the packaging materials used and the condition upon arrival. Make sure the photos include close-ups of shipping documentation like tracking labels and barcodes, as they confirm delivery details. Good lighting and focus are essential to avoid blurry images. These extensive shots provide solid evidence of how the package looked when received, which is vital if you need to prove mishandling or damage caused during transit. The more thorough your photos, the better your chances of a smooth and successful claim process.
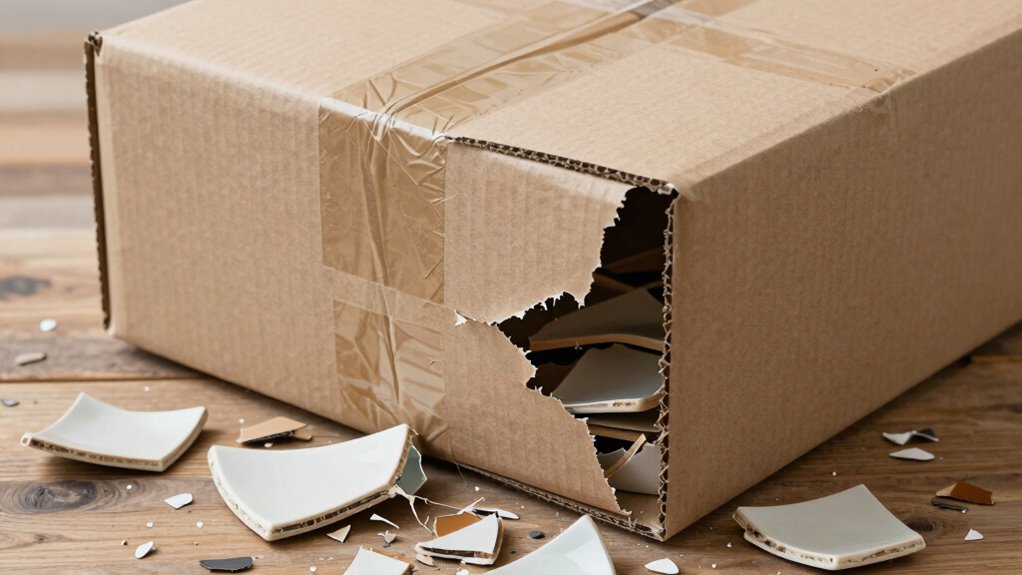
Highlight Damage Areas
Have you clearly documented the damage on your package? Precise photos are essential for the claim process. Take overall photos that highlight all damage areas, including dents, tears, or crushed sections. Use your camera to capture the package from different angles, showing how packaging materials may have failed. The following table illustrates key damage points to focus on:
| Damage Area | Packaging Material | Description |
|---|---|---|
| Dents or punctures | Bubble wrap, cardboard | Visible impact points |
| Tears | Tape, stretch wrap | Rips or splits |
| Crushing | Outer box, foam fillers | Deformed packaging |
| Missing parts | Labels, seals | Evidence of tampering |
Clear photos of these areas support your claim and guarantee the claim process moves smoothly. Additionally, capturing images of packaging integrity can help demonstrate whether proper handling procedures were followed during transit.
Use Good Lighting
Good lighting is essential for capturing clear, detailed photos of your package. Proper lighting guarantees all damage and packaging details are visible, making your claim stronger. To improve your photo composition, consider these lighting tips:
- Use natural light whenever possible to avoid shadows and glare.
- Avoid harsh or uneven lighting that can obscure damage details.
- Take photos from multiple angles to show the overall condition clearly.
- Remember that consistent and adequate lighting helps ensure your photos are accurate representations, which is vital for a successful claim.
Good lighting highlights the damage and helps the claims process move smoothly. Keep the package well-lit and avoid shadows that could hide important details. Proper photo composition, combined with good lighting, makes your evidence compelling and easier for claims adjusters to review. Follow these simple lighting tips to ensure your photos are clear, detailed, and effective.

SolidSS Wartenberg Neuro Pinwheel Stainless Steel Diagnostic Instrument Pin Wheel for Neurological Nerve Reaction Test, Pinwheel Roller for Testing Nerve Sensitivity
Material:Pinwheel stainless Steel Build,waterproof, rust-resistant, and easy to keep clean, ensuring long-lasting durability for reliable use.
As an affiliate, we earn on qualifying purchases.
As an affiliate, we earn on qualifying purchases.
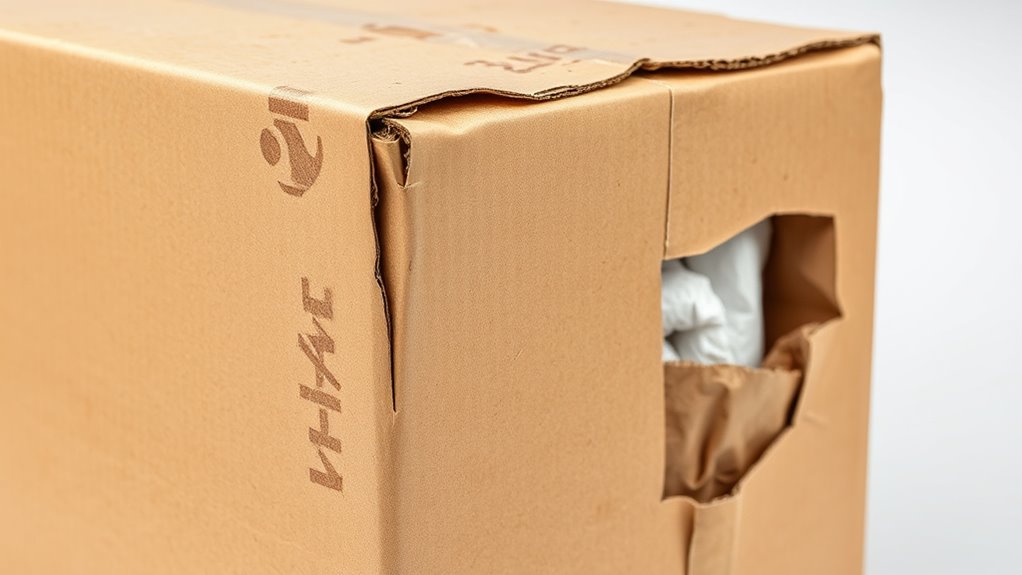
Capture Close-Up Shots of the Damage
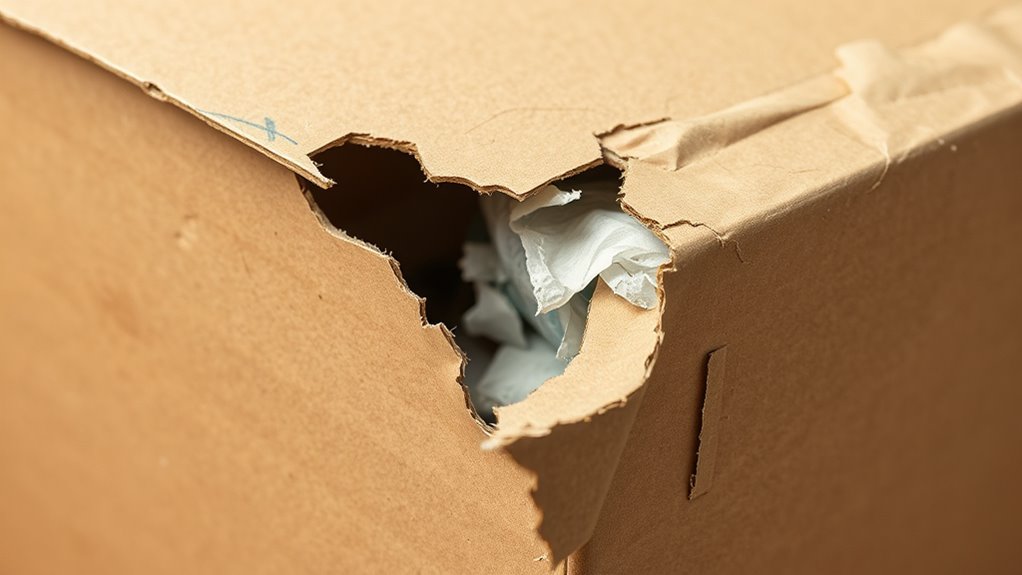
Why is capturing close-up shots of the damage so vital? These detailed images clearly show the extent of the damage, making it easier for insurers to assess the claim. Focus on capturing the packaging integrity—note tears, dents, or crushed areas that might have compromised the box. Make sure to get close-ups of any visible damage to the item itself, highlighting specific issues. Also, photograph the shipping labels, especially if they show signs of mishandling like tears or smudges, which can support your case. Clear, close-up photos help avoid ambiguity and provide undeniable evidence. Use a steady hand, good lighting, and focus on the damaged areas. These detailed shots are essential for a smooth and successful claim process.

novelinks Transparent 4" x 6" Photo Organizers and Photo Storage Box with Handle, 16 Inner Photo Cases, Portable Picture Organizers & Photo Storage Containers (Clear)
All-in-One Photo & Craft Organizer : Perfect for storing 4×6 photographs, greeting cards, scrapbooking supplies, stickers, or office…
As an affiliate, we earn on qualifying purchases.
As an affiliate, we earn on qualifying purchases.
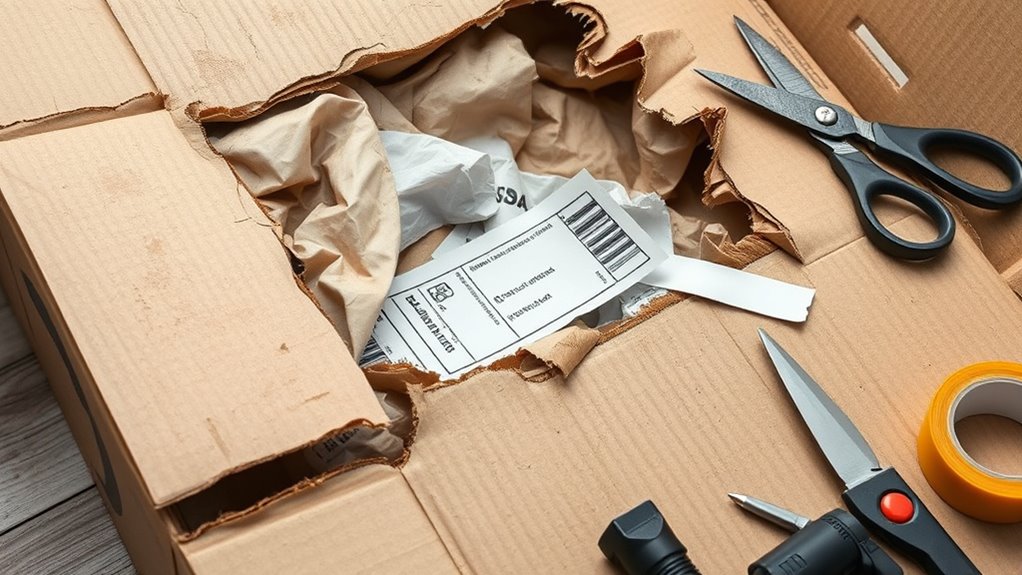
Document the Packaging and Labels
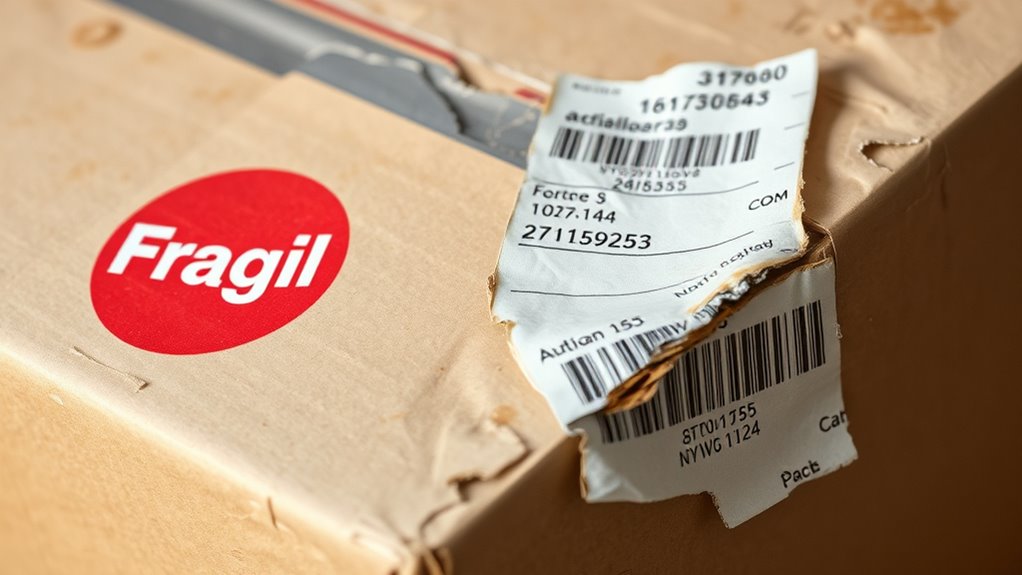
To strengthen your claim, thoroughly documenting the packaging and labels is essential. Take clear photos of the packaging materials used, especially if they appear inadequate or damaged. Capture close-ups of the shipping labels, ensuring the barcode, tracking number, and sender information are visible and legible. These details help verify how the item was packed and identify the carrier responsible. Make sure to photograph any markings that indicate handling instructions or warnings. Proper documentation of packaging and labels supports your case by showing potential mishandling or improper packing. Remember, clear images of these elements can make a significant difference when filing your claim. Being detailed now saves time later and increases your chances of a successful resolution. Additionally, documenting the handling instructions and safety warnings can provide evidence of proper or improper packaging practices. Highlighting any visible damage or wear to the packaging can further support your claim by demonstrating how the item may have been compromised during transit. Including photographs of the packing technique can also help illustrate whether the item was adequately protected, especially considering the importance of AI-driven smart packaging solutions in reducing transit damage. Incorporating proper documentation practices ensures all relevant details are captured to back up your claim effectively.
Photograph Any Shipping Labels or Barcodes
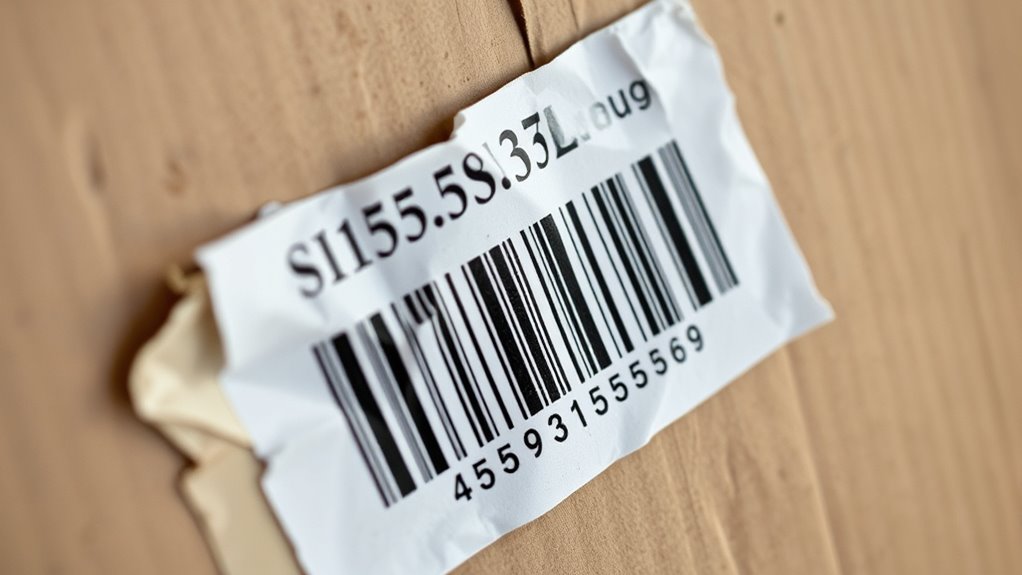
Make sure to photograph all shipping labels clearly, so the details are easy to read. Pay special attention to capturing barcodes in focus and fully visible. These images are essential for verifying shipment information during your claim process.
Capture Label Details Clearly
Capturing label details clearly is essential when documenting damage claims, as it guarantees all critical information is visible and legible. Take close-up photos of shipping labels and barcodes, making certain the packaging materials don’t obscure any details. Focus on label accuracy to avoid confusion later, especially if packaging materials are torn or damaged. Clear images help verify tracking numbers, addresses, and handling instructions quickly. Additionally, ensure that your photographs are well-lit so that all details are easy to read and free of shadows. Make sure lighting is sufficient so details aren’t shadowed or blurry. Keep the camera steady for sharp, readable images. Capture multiple angles if labels are partially obscured or damaged. Properly documenting damage can significantly streamline the claims process and prevent delays. Remember that product packaging often contains important clues about handling and shipping conditions that can support your claim. Paying attention to shipping labels and barcodes can also assist in tracking and verifying the shipment details more efficiently.
Ensure Barcode Visibility
Ensuring barcode visibility is crucial because it verifies the package’s tracking information and helps prevent delays or misdelivery. When photographing your shipment, make certain the barcode is clear and unobstructed, so scanning can be easily performed later if needed. Check that the barcode isn’t smudged, torn, or obscured by packaging materials, which could compromise tracking accuracy. Clear barcode visibility also confirms the packaging integrity, showing that labels weren’t damaged during transit. Take close-up shots of the shipping labels and barcodes from different angles to provide thorough documentation. Properly capturing these details ensures you have solid evidence if a claim arises, and it helps streamline the resolution process with the carrier. Always double-check that the barcode is legible before submitting your photos.
Record the Condition of Contents Inside the Package
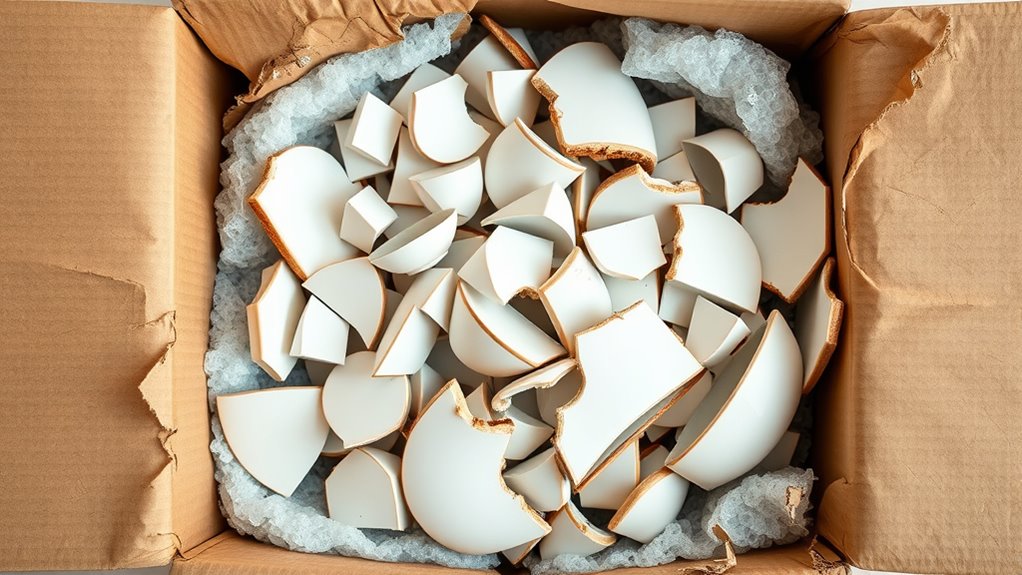
When documenting the contents inside the package, you should carefully note their condition before the package is opened. This step is vital for proper contents inspection and to verify if items arrived damaged. Start by examining the packaging materials—look for tears, dents, or holes that might have contributed to damage. Next, check each item’s condition, noting any dents, cracks, or missing parts. Finally, take clear photos of the contents without removing them from the package to capture their original state. Keep an organized record of these observations. Doing so provides strong evidence to support your claim, especially if the damage isn’t immediately visible from the outside. Proper documentation ensures your claim process is smooth and well-supported. Additionally, understanding navigation and mapping features of smart home devices can help identify if internal damage affected device function after delivery.
Use Proper Lighting and Focus for Sharp Images

Using proper lighting and focus is essential to produce clear, detailed images that accurately document damage. Good lighting techniques, like using natural light or a bright, even source, minimize shadows and highlight flaws. Avoid harsh or uneven lighting that can obscure details. Focus adjustment is equally important; ensure your camera or phone is sharp on the area showing damage. Tap on the screen to lock focus if possible, and double-check the image before capturing. Well-lit, focused photos make it easier to assess and verify damage, providing compelling evidence for your claim. Remember, blurry or poorly lit images can weaken your case, so take your time to set up each shot with attention to lighting and focus. Proper documentation with clear images can significantly streamline the claims process. Additionally, reviewing your photos before submitting can help ensure all damage is accurately captured. Incorporating connected fitness technology tools, like photo apps with editing or enhancement features, can also improve your images and ensure they meet the required standards. Using photo editing tools to adjust brightness or sharpness can further enhance your evidence quality. Paying attention to image clarity and maintaining consistent lighting conditions will help produce the most effective documentation possible.
Take Multiple Angles for a Complete Perspective

Taking photos from multiple angles is essential to capturing a complete picture of the damage. This approach helps guarantee all affected areas are documented, especially when packaging techniques may obscure certain flaws. Use different perspectives to highlight the extent of the damage and provide context for delivery tracking. Additionally, documenting proper packaging methods and any signs of mishandling can strengthen your claim by demonstrating how the item was protected or compromised during transit. Ensuring you understand the importance of damage documentation can make a significant difference in the success of your claim. Remember, thorough visual evidence not only supports your case but also expedites the claims process. Being aware of ownership essentials like detailed photo records can further support your claims and streamline resolution. Incorporating clear, detailed images can also help prevent misunderstandings and facilitate faster resolution of disputes.
Organize and Save Your Photo Evidence Effectively

Organizing and saving your photo evidence promptly guarantees that all images are clear, complete, and easy to retrieve when needed. Start by choosing reliable storage options, such as cloud services or external drives, to prevent data loss. When organizing digital files, create folders labeled clearly with dates and descriptions, like “Damaged Box – 04/27/2024.” Maintain a consistent naming convention to locate images quickly. Avoid clutter by removing duplicate or blurry photos, leaving only the best evidence. Regularly back up your files to multiple locations for added security. By establishing a straightforward system for organizing digital files and selecting appropriate storage options, you assure your photo evidence remains accessible and intact, making your claim process smoother and more efficient.
Frequently Asked Questions
How Many Photos Should I Take for an Effective Claim?
You should take at least 3 to 5 photos for an effective claim, ensuring good photo organization. Make sure the images are clear, well-lit, and focus on different angles to capture all damage details. High image quality is essential—use a steady hand or tripod if needed. Properly organized photos help speed up the process and provide strong evidence, increasing your chances of a successful claim.
What if the Package Is Too Damaged to Photograph Clearly?
If the package is too damaged to photograph clearly, focus on documenting the overall damage and the packaging’s condition. Take multiple shots from different angles, including close-ups of any labels or damage points, to support your claim. For damage prevention, always handle packages carefully and consider reinforcing fragile items before shipping. These efforts can help strengthen your case, even when clear photos aren’t possible, by showing the extent of the damage and the packaging’s state upon receipt.
Can I Edit or Enhance Photos Before Submitting?
Did you know that 85% of insurance claims are approved when clear photo evidence is provided? Yes, you can do some photo editing or image enhancement before submitting your photos. Just guarantee your edits accurately represent the damage, avoiding misleading enhancements. Use basic tools to improve clarity or highlight specific areas, but don’t alter the actual damage. Clear, honest images help streamline your claim process and increase your chances of success.
Should I Include Photos of the Shipping Label With the Damaged Package?
You should include photos of the shipping label along with the damaged package. The shipping label helps verify the sender and delivery details, which is vital if there’s packaging damage or missing items. Clear photos of both the damaged packaging and the shipping label provide strong evidence for your claim, making it easier for the carrier to process. Make certain the label is legible and shows all relevant tracking information to support your case effectively.
How Long Should I Keep the Photo Evidence After Filing My Claim?
You should keep your photo evidence for at least 90 days after filing your claim. This allows ample time for processing and any follow-up requests. Make sure to organize your photo storage and create digital backups to prevent losing important evidence. Maintaining your photos accessible ensures you can quickly provide additional proof if needed, helping your claim process smoothly and efficiently.
Conclusion
By following these photo tips, you’ll have strong evidence to support your claim. Don’t worry if some shots seem repetitive—multiple angles and close-ups can clearly show the damage, making your case stronger. Think of your photos as a visual story that leaves no room for doubt. With sharp, organized images, you’ll streamline the claims process and get the resolution you deserve faster. Remember, good evidence makes all the difference.